
Engines are the most important part of vehicles. Filters are an essential part of any engine. The main work of the filter is to maintain a proper flow and keep the impurities out. This helps the engine to work properly by filtering dust from the air, impurities in the fuel, and air particles in motor oil. But the filter requires proper maintenance because if there are so many particles in the filter, it will make the flow difficult and the engine cannot work to its full efficiency. It becomes more necessary if you buy a Japanese used cars for sale in South Africa. This article by SAT Japan is going to guide you on how you can change the filter of your vehicle yourself so you can enjoy a seamless ride with optimal engine performance.
DIY Vehicle Care
Here is the step by step procedure of changing the car filter:
1. Get the supplies
It’s important to have everything sitting next to you so that when you are working, you can focus


solely on toy work.
For this, first and most importantly you need a new filter that fits your vehicle, as there are so
many different types of filters available according to the size of the engine. So select one that
suits your vehicle, and if needed, get help from someone who can help you. You
might need a screwdriver or socket wrench (vary from car to car) and gloves ( optional).
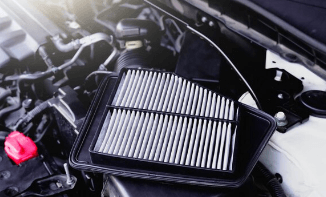
2. Locate the air filter housing
The Next step is to locate the filter housing. Locating it is not a difficult thing; you can typically
find the air filter in a black plastic box under the hood. This box is usually located near the
engine. To keep the filter in its place, it mostly has a clip or a screw securing it.
3. Open the housing
In the next step, you have to be careful while handling the screw. Now, you have to unscrew or
remove the clip. The screw is small, so carefully keep them aside and do not drop any screws into the engine bay.
4. Remove the old filter
Once you open the housing, you will see an old filter. At this point, you have to take notes of the
orientation so that while installing the new filter, you know how the last one was installed. This
way, it will be easy to install the new one. Now, you simply have to lift the old filter out of the
housing for a new one to be installed.
5. Inspect and clean
Now, before you install the new filter, check the housing for any debris or dirt. If there is any
particle, clean it. This step is important for the longevity of your new filter.
6. Install the new filter
Now install the new filter in the housing. Make sure it’s placed right according to the last one’s
noted position. That is why you should be focused while removing the old filter.
7. Close the housing
After the proper installation of the new filter, Now simply put the clip or screw back in place and
screw it tightly so that it will not fall.
8. Test run
Start your car and let the engine work for some minutes to make sure everything is working right.
9. Dispose of the old filter
Make sure you dispose of the old filter properly; some auto part store takes the old filter for
recycling purposes
10. Record the change.
It’s good to record the date of changing the filter so you know when to change the filter in
future.
Changing the filter might sound difficult, but it’s quite the opposite. You just need to be a bit
careful, and it is going to be a piece of cake. Just give it a try.